|
|
| (298 intermediate revisions by 2 users not shown) |
| Line 1: |
Line 1: |
| − | == Things you'll need to digitize reel tapes: == | + | = Fireface 800 = |
| | | | |
| − | === The Basic Requirements === | + | = Echo Mona = |
| − | * A Mac G4
| |
| − | * The Echo Mona analog to digital audio converter--the one at the top of the picture.
| |
| − | [[Image:Reel-Echo-Mixer.jpg]]
| |
| − | * A Reel Tape Recorder/Player
| |
| − | [[Image:Reel-Player.jpg]]
| |
| − | * 2 Shielded XLR microphone cables
| |
| − | [[Image:Reel-XLR-Cable.jpg]]
| |
| − | * Reels!
| |
| − | [[Image:Reel-Box.jpg]]
| |
| − | [[Image:Reel-Tape.jpg]]
| |
| | | | |
| | + | == Digitizing == |
| | | | |
| − | === Sound Monitoring via External Speakers ===
| + | Once all equipment is on and your settings are correct, you're ready to digitize. |
| − | * The Mixer
| |
| − | [[Image:Reel-Echo-Mixer.jpg]]
| |
| − | * 2 speakers
| |
| − | * A stereo RCA cable
| |
| − | * 2 XLR stereo cables
| |
| − | * Stereo 1/8 inch mini jack to dual RCA cable.
| |
| − | * 6 RCA to 1/4 inch jack adapters
| |
| | | | |
| | + | === Process === |
| | | | |
| − | == The Setup ==
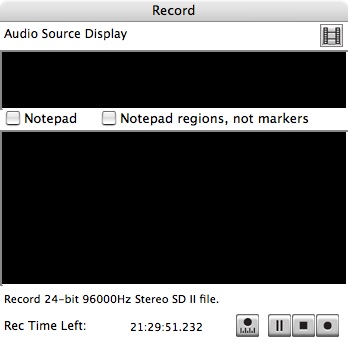
| + | 1. Press record (the circle) on the toolbar. A Record Window will open. Please note, '''you are not yet recording anything'''. |
| | | | |
| − | === The Audio Editing Station ===
| + | [[Image:Peak4-RecWin.jpg]] |
| − | This station should be set up already, but if it's not, here's what needs to be connected & where.
| |
| | | | |
| − | 1. Plug the Stereo 1/8 inch mini jack into the headphones jack of the G4. Connect the dual RCA (red & white usually) ends to the 2 adapters and plug the Red end into channel 4 and the other end into channel 3 on the mixer. Remember, '''Red is Right.''' In the following picture, the yellow arrow points to channels 3 & 4.
| |
| − | [[Image:Reel-Mixer34.JPG]]
| |
| | | | |
| − | 2. Plug one end of each XLR stereo cable into the L or R jacks in the "Main Out" section of the mixer (top right and corner). Plug the other end into the respective speaker. | + | 2. Press play on the reel recorder (the single triangle pointing right). Check the levels on the recorder to make sure they are below the red. Check the levels on the MONA to make sure they are not in the red or maxing out. Next look at your computer monitor. On the Transport bar, you should see the levels that are coming into the computer from the reel recorder/Echo Mona. If these levels are hitting orange or red, you need to reduce the output levels on the Mona (using the knobs underneath the numbers 3 & 4). If the levels are green, but very low, you likely need to increase the output levels on the Mona (or the reel recorder). |
| − | [[Image:Reel-MixerMainOut.JPG]]
| |
| | | | |
| − | 3. Connect the dual RCA (red & white usually) ends on an RCA cable to the 1/4 inch stereo jack adapters on each end. Plug one end of the stereo RCA cable into channels 1 and 2 on the mixer. Channel 2 is right and channel 1 is left. Plug the other end into outputs 1 & 2 on the back of the MONA. Output 1 is left and output 2 is right.
| + | [[Image:Peak4-Transport.jpg]] |
| − | [[Image:Reel-Mixer12.JPG]] | |
| | | | |
| − | 4. Plug everything in and turn it on.
| |
| | | | |
| − | * Now you're set up to hear sound from your computer and from the MONA on the external speakers!
| + | 3. Once your levels are good, stop and rewind the reel. You will probably have to re-thread the tape. |
| | | | |
| | + | 4. Press record on the Record Window in Peak4. Press Play on the reel machine. You should see the levels on the Transport bar and you should see a waveform appear in the Record Window as the audio is recorded. |
| | | | |
| | + | 5. Listen to digitization while it is in process. |
| | | | |
| − | === The Reel to MONA Connection ===
| + | 6. When the side finishes playing, press stop on the Record window of Peak. A Save As window will open. Enter the filename. Click SAVE. The file will save and open. Click on File>Save As and when the window opens, leave the file name the same, but change the file type to WAVE. Click SAVE. You will be prompted to replace a file of the same name that already exists. Click SAVE. |
| − | | |
| − | 1. Take the 2 shieled XLR microphone cables and plug one end of each into channels 1 & 2 of the "line output" section on the back of the Reel Recorder. Channel 2 should be right; channel 1 should be left.
| |
| − | [[Image:Reel-Player-Back.jpg]]
| |
| − | | |
| − | 2. Plug the other end into channels 3 & 4 of the ECHO MONA. The cable in channel 2 of the reel recorder should end up in channel 4 of the MONA (right) and the cable in channel 1 of the reel recorder should end up in channel 3 of the MONA (left).
| |
| − | [[Image:Reel-Mona-Cables34.jpg]]
| |
| − | | |
| − | | |
| − | | |
| − | === Setting up the Reel Recorder ===
| |
| − | | |
| − | ==== Mounting the Reels ====
| |
| − | | |
| − | 1. Mount an empty reel onto the right hand (take-up) reel table. The 3 teeth on the reel spindle must line up with the reel drive nail in order to mount the reel. If they are misaligned, you can pull out the spindle and turn it to align it. When the tape is mounted, pull out the spindle and turn it so that the teeth no longer align. This will lock the reel into place on the recorder.
| |
| − | [[Image:Reel-Spindle.jpg]]
| |
| − | | |
| − | 2. Mount the reel you wish to digitize on the left-hand (supply) reel table. Follow the same procedure as above.
| |
| − | | |
| − | | |
| − | ==== Threading the Tape ====
| |
| − | There are detailed instructions on page 4-6 of the manual for the reel recorder.
| |
| − | | |
| − | 1. Thread the tape as is shown in the following picture.
| |
| − | [[Image:Reel-ThreadMe.jpg]]
| |
| − | | |
| − | 2. Wind the tape onto the empty reel just enough to keep it in place. Here's what it should look like when you're done.
| |
| − | [[Image:Reel-TapeLoaded.jpg]]
| |
| − | | |
| − | | |
| − | ==== Reel Recorder Settings ====
| |
| − | | |
| − | 1. There are two speed settings on the MX-5050 reel recorder: High (15 ips or inches per second) and Low (7.5 ips). If your reel has no markings indicating the speed at which it was recorded, chances are it was recorded at 7.5 ips (especially if it's one of Regula's). The speed control panel is to the lower left of the recorder heads (circled in yellow in this picture).
| |
| − | [[Image:Reel-SpeedControl.JPG]]
| |
| − | | |
| − | * Just below and to the right of this, there is a button you can push to change the speed from low to high. When you press this button, the speed control panel displays the new speed.
| |
| | | | |
| | + | 7. Next you should listen to the beginning, several sections in the middle and the end of the file to ensure that the recording is true to the source material. If there are aberrations or unusual sounds that aren't on the source material, there is a problem with the digitization. This often occurs when you use the computer to do other things while digitizing. '''It is important that you do not use the computer while it is recording!''' If you find errors in the digitization, you need to redo it. |
| | | | |
| − | 2. To the right of the speed button, there are 2 buttons for choosing the reel size. The left-hand button is for the supply reel and the right-hand button is for the take-up reel. For reels smaller than 10.5 inches (in diameter) switch this to the "S" position.
| + | 8. Once you have verified that the file has no errors or problems, you should place it in the appropriate location on the server. |
| − | [[Image:Reel-SizeSwitch.JPG]]
| |
| | | | |
| | + | === Server === |
| | | | |
| − | 3. There is an Output Level Knob to the right of the VU meters. The outer ring is for channel 1 and the inner knob is for channel 2. You can monitor the output levels on the VU meters and adjust them so that they never go into the red.
| + | [[How to access media stored on the server]] |
| − | [[Image:Reel-OutputLevel.JPG]]
| |
| | | | |
| | + | == File Names == |
| | | | |
| | + | Your filename should include several identifying factors. |
| | + | * Example: UKR_VHS-1.dv |
| | | | |
| − | === Software Settings ===
| + | In this example the file name contains four parts separated by punctuation. |
| | | | |
| − | ==== Using Peak 4 ====
| + | Filename Parts |
| | + | * "UKR" identifies the collection to which the file belongs. |
| | + | * "VHS" identifies the type of source media from which the file came. |
| | + | * "1" identifies the file's place in the collection (eg. It is 1 of 3 VHS tapes in the Ukrainian Collection). |
| | + | * "dv" is part of the file extension, which indicates the file type. |
| | | | |
| − | ===== Audio Output =====
| + | Punctuation |
| − | | + | * "_" (underscore) separates the collection name from the type of source media. |
| − | 1. To adjust the audio output settings in Peak, open Peak. Click on the menu Audio>Sound Out>Core Audio. A CoreAudio Playback window will open.
| + | * "-" (hyphen or dash) separates the type of source media from the file's place in the collection. |
| − | | + | * "." (period) separates the filename from the file extension |
| − | [[Image:Peak_SoundOut_CoreAudio.JPG]]
| + | * Please note that the period should ONLY be used to separate the filename from the file extension. |
| − | | |
| − | | |
| − | 2. Make sure the settings in the CoreAudio Playback window are as follows: Clock Source: Internal; '''Sample Rate: 96000'''; '''Play Through: Out 0 1 & 2'''.
| |
| − | | |
| − | [[Image:Reel-CoreAuOut.jpg]]
| |
| − | | |
| − | | |
| − | 3. Click on "Hardware Settings..." and make sure the settings are as follows: Input Device: Mona slot-5; Output Device: Mona slot-5; Buffer Size: 4096. Click "OK" on this window and then on the CoreAudio Playback window.
| |
| − | | |
| − | [[Image:Reel-CoAuOut-HWSett.jpg]]
| |
| − | | |
| − | | |
| − | 4. Now you are set up to hear audio from Peak 4.
| |
| − | | |
| − | | |
| − | ===== Audio Input =====
| |
| − | | |
| − | 1. Click on the Record Settings button on the toolbar.
| |
| − | | |
| − | [[Image:Peak_Toolbar_RecordSettings.JPG]]
| |
| − | | |
| − | | |
| − | 2. In the Record Settings window, click on "Device and Sample Format".
| |
| − | | |
| − | [[Image:Reel-DevSampForm.jpg]]
| |
| − | | |
| − | 3. The settings should be as follows: '''Record Through: In 2 3 & 4'''; '''Sample Rate: 96000'''; Clock Source: Internal; Channels: Stereo; '''Bit Depth: 24-bit'''. Click "OK"
| |
| − | | |
| − | [[Image:Reel-CoAuRecSett.jpg]]
| |
| − | | |
| − | 4. Click on "Hardware Settings..." and change the settings to the following: Input Device: Mona slot-5; Output Device: Mona slot-5; Buffer Size: 4096. Click "OK" on this window and then on the CoreAudio Playback window. (See above image from 3. under "Audio Output".)
| |
| − | | |
| − | * Now you are ready to digitize!
| |
| − | | |
| − | | |
| − | | |
| − | == Digitizing ==
| |
| − | | |
| − | Once all equipment is on and your settings are correct, you're ready to digitize.
| |
| − | | |
| − | 1. Press record (the circle) on the toolbar. A Record Window will open. Please note, '''you are not yet recording anything'''.
| |
| − | | |
| − | 2. Press play on the reel recorder (the single triangle pointing right). Check the levels on the recorder to make sure they are below the red. Check the levels on the MONA to make sure they are not in the red or maxing out. Next look at your computer monitor. On the Transport bar, you should see the levels that are coming into the computer from the reel recorder/Echo Mona. If these levels are hitting orange or red, you need to reduce the output levels on the Mona (using the knobs underneath the numbers 3 & 4). If the levels are green, but very low, you need to increase the output levels on the Mona (or the reel recorder).
| |
| − | | |
| − | 3. Once your levels are good, stop and rewind the reel. You will probably have to re-thread the tape.
| |
| − | | |
| − | 4. Press record on the Record Window in Peak4. Press Play on the reel machine. You should see the levels on the Transport bar and you should see a waveforme appear in the Record Window as the audio is recorded.
| |
| − | | |
| − | 5. Listen to digitization while it is in process.
| |
| − | | |
| − | 6. When the side finishes playing, press stop on the Record window of Peak. A Save As window will open. Enter the filename. Click SAVE. The file will save and open. Click on File>Save As and when the window opens, leave the file name the same, but change the file type to WAVE. Click SAVE. You will be prompted to replace a file of the same name that already exists. Click SAVE.
| |
| | | | |
| − | == Saving the File ==
| + | Your filename should comply with the system your entire collection uses. |
| − | Coming soon.
| |
Fireface 800
Echo Mona
Digitizing
Once all equipment is on and your settings are correct, you're ready to digitize.
Process
1. Press record (the circle) on the toolbar. A Record Window will open. Please note, you are not yet recording anything.
2. Press play on the reel recorder (the single triangle pointing right). Check the levels on the recorder to make sure they are below the red. Check the levels on the MONA to make sure they are not in the red or maxing out. Next look at your computer monitor. On the Transport bar, you should see the levels that are coming into the computer from the reel recorder/Echo Mona. If these levels are hitting orange or red, you need to reduce the output levels on the Mona (using the knobs underneath the numbers 3 & 4). If the levels are green, but very low, you likely need to increase the output levels on the Mona (or the reel recorder).

3. Once your levels are good, stop and rewind the reel. You will probably have to re-thread the tape.
4. Press record on the Record Window in Peak4. Press Play on the reel machine. You should see the levels on the Transport bar and you should see a waveform appear in the Record Window as the audio is recorded.
5. Listen to digitization while it is in process.
6. When the side finishes playing, press stop on the Record window of Peak. A Save As window will open. Enter the filename. Click SAVE. The file will save and open. Click on File>Save As and when the window opens, leave the file name the same, but change the file type to WAVE. Click SAVE. You will be prompted to replace a file of the same name that already exists. Click SAVE.
7. Next you should listen to the beginning, several sections in the middle and the end of the file to ensure that the recording is true to the source material. If there are aberrations or unusual sounds that aren't on the source material, there is a problem with the digitization. This often occurs when you use the computer to do other things while digitizing. It is important that you do not use the computer while it is recording! If you find errors in the digitization, you need to redo it.
8. Once you have verified that the file has no errors or problems, you should place it in the appropriate location on the server.
Server
How to access media stored on the server
File Names
Your filename should include several identifying factors.
In this example the file name contains four parts separated by punctuation.
Filename Parts
- "UKR" identifies the collection to which the file belongs.
- "VHS" identifies the type of source media from which the file came.
- "1" identifies the file's place in the collection (eg. It is 1 of 3 VHS tapes in the Ukrainian Collection).
- "dv" is part of the file extension, which indicates the file type.
Punctuation
- "_" (underscore) separates the collection name from the type of source media.
- "-" (hyphen or dash) separates the type of source media from the file's place in the collection.
- "." (period) separates the filename from the file extension
- Please note that the period should ONLY be used to separate the filename from the file extension.
Your filename should comply with the system your entire collection uses.
