Reel Tapes
Fireface 800
Echo Mona
Digitizing
Once all equipment is on and your settings are correct, you're ready to digitize.
Process
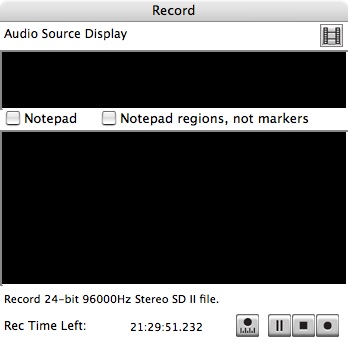
1. Press record (the circle) on the toolbar. A Record Window will open. Please note, you are not yet recording anything.
2. Press play on the reel recorder (the single triangle pointing right). Check the levels on the recorder to make sure they are below the red. Check the levels on the MONA to make sure they are not in the red or maxing out. Next look at your computer monitor. On the Transport bar, you should see the levels that are coming into the computer from the reel recorder/Echo Mona. If these levels are hitting orange or red, you need to reduce the output levels on the Mona (using the knobs underneath the numbers 3 & 4). If the levels are green, but very low, you likely need to increase the output levels on the Mona (or the reel recorder).
3. Once your levels are good, stop and rewind the reel. You will probably have to re-thread the tape.
4. Press record on the Record Window in Peak4. Press Play on the reel machine. You should see the levels on the Transport bar and you should see a waveform appear in the Record Window as the audio is recorded.
5. Listen to digitization while it is in process.
6. When the side finishes playing, press stop on the Record window of Peak. A Save As window will open. Enter the filename. Click SAVE. The file will save and open. Click on File>Save As and when the window opens, leave the file name the same, but change the file type to WAVE. Click SAVE. You will be prompted to replace a file of the same name that already exists. Click SAVE.
7. Next you should listen to the beginning, several sections in the middle and the end of the file to ensure that the recording is true to the source material. If there are aberrations or unusual sounds that aren't on the source material, there is a problem with the digitization. This often occurs when you use the computer to do other things while digitizing. It is important that you do not use the computer while it is recording! If you find errors in the digitization, you need to redo it.
8. Once you have verified that the file has no errors or problems, you should place it in the appropriate location on the server.
Server
How to access media stored on the server
File Names
Your filename should include several identifying factors.
- Example: UKR_VHS-1.dv
In this example the file name contains four parts separated by punctuation.
Filename Parts
- "UKR" identifies the collection to which the file belongs.
- "VHS" identifies the type of source media from which the file came.
- "1" identifies the file's place in the collection (eg. It is 1 of 3 VHS tapes in the Ukrainian Collection).
- "dv" is part of the file extension, which indicates the file type.
Punctuation
- "_" (underscore) separates the collection name from the type of source media.
- "-" (hyphen or dash) separates the type of source media from the file's place in the collection.
- "." (period) separates the filename from the file extension
- Please note that the period should ONLY be used to separate the filename from the file extension.
Your filename should comply with the system your entire collection uses.
